Drills used, etc.

Status
Not open for further replies.

bjp_ne_elec

Senior Member
Location
Southern NH
Probabaly going to do more "old work" than I've done in the past, so I'd like to see what tips I can can get from you guys.

When needing to figure out where to drill a hole to fish a wire up a wall - what things do you do to figure out where to drill. And then when you drill, what size drill bit do you use?

Now, another thing I'd be interestd in hearing, is what are the sizes of the various drills you might stock - and this would include both wood bits that you'd drill holes to fish wires - as well as hole saws (beyond the standard 7/8" and 1-1/8" that all of us probably have for 1/2" and 3/4" fittings, etc. I'm thinking about when you pop a hole for a round work box, and anything else you may use a drill or hole saw for.

Thanks,

Brett
 
If drilling from the basement up into a wall I will usually drive a very small nail down against the molding through the carpet and then find it in the ceiling below. Measure over about 2" and drill a 1/2" hole up. Now you can snake right up to your cutout in the wall. If there is a hardwood floor instead of a nail I will drill a tiny hole against the molding and slip a piece of thin wire through it. Now you can locate the exact spot below. For the most part we use 18 volt Dewalt drills. For roughing a new house with wood studs we would use a Milwaukee right angle drill with a 5/8" bit for most of the holes.
 
I'm with Trevor.
I miss basements.....
I drill most of mine down walls
I do however carry a sliver of long paddle bits too in 3/8 to 3/4"

18v Dewalt hammer drill & an 18v dewalt regular as a back up.
This came in handy SAturday as I found I had left my Hammer drill on my first job and need a back up.
 
Last edited:
When it comes to sheer torque, and crawling under a house, I like my 24-volt cordless DeWalt. For the auger bits, I like Greenlee's Nail-eaters. Diameter depends on wire/cable size, but I have 18" augers from 1/4" up to 1.5", roughly every 1/8" up tp 1", and every 1/4" above that.

For round holes in drywall, wood panels, etc., I like hole-saws. I have a Greenlee 1/2" thru 2" conduit-size set (I use cutting oil for metal; keeps them sharp & reduces flakes), plus a 4" (for fan boxes) and 4-1/4" (for 4" cans and for plastic round OWB's) as well as a 6-3/8" for 6" cans.

A good aggressive drywall saw is a must for any straight cutting in drywal or wood. A jigsaw or reciprocating can be used if you're real careful, and the latter with a metal blade is great for cutting through nails to remove nail-on boxes through the wall hole, again if you're careful.

Wall fishing is where experience and intuition will come into play. I recommend a small, welded-link chain and a magnet on a flexible wand. Plus, a mirror on a pivoting handle (auto-parts stores are a good source) and a flexible-type flashlight can be useful. String, fish-tape, long needle-nose pliers, etc.

I'd also recommend a couple of 4' and/or 6' flex bits, but there is a sharp learning curve in using these. It's so easy to damage a floor above a ceiling space when the tip veers off the intended path. When you become really good, there's almost no space you can't wire.

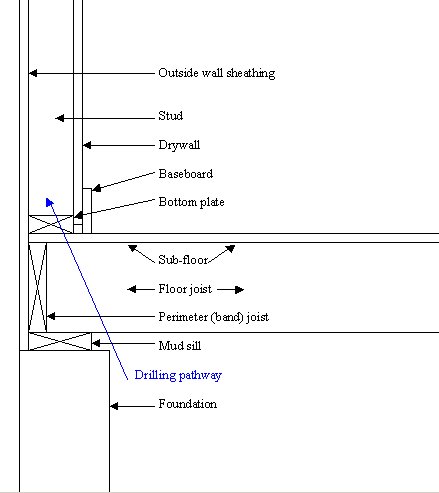
There are two parts to this work: the tools and the building. For example, imagine drilling into a wall from a crawl-space below, either at an outside wall or a wall above a center support beam. Because of the foundation, you can't drill vertically, and you could puncture the outside of the house.

Also, even when following the nail-hole-by-the-baseboard advice above (good advice, although I rarely do it), keep in mind that the top of a sloped hole will be farther away from you than the entrance point, due to the thickness of the sub-floor and the bottom plate (typically 2-1/4"), so start close to you.

The best single piece of advice I can give you is to study the inside of several different houses (solid framing, truss-joists, etc.) under condtruction. Look at all of the details where floors, walls (interior and exterior), and ceilings intersect. Imagine having to snake a wire after drywalling.

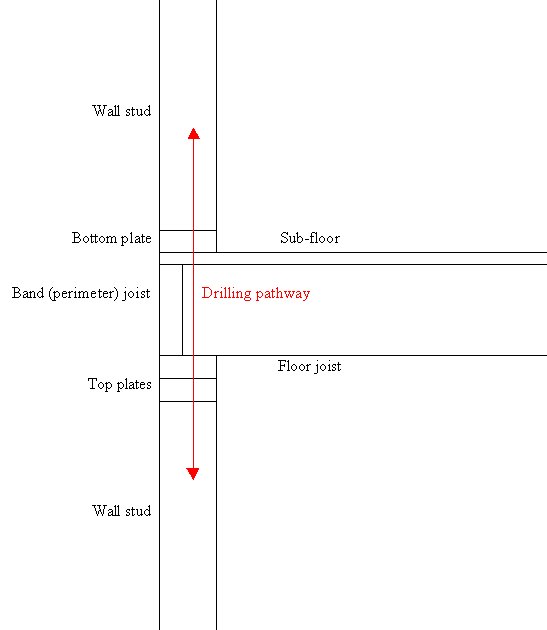
Compare the directions you can drill and fish now, and compare that to how you'd have to drill a hole and fish the wire blindly, without making openings in the drywall (occasionally unavoidable). Some time back, I made a few cutaway drawings when asked about this kind of work:

2x4.jpg
Wall2.jpg


Walls.jpg


By the way, I made these drawing with MSWord.
 
Last edited:
Larry - excellent feedback!

On the flex bits, when do you typically use them? I've seen them hanging there at the supply house, but have been leary of picking one up - to your point about the sharp learning curve. The scenarios you mention about damage to a floor, are you drilling up from first floor to second floor - and if so, what deflects the tip of the drill to do the damage? I'm just not picturing the situation that you're talking to, I quess.

Thanks a bunch for your response,

Brett
 
Last edited:
Brett, I've used the flex bits to get through floors where there was a stone foundation below and not enough room to drill up and the kitchen cabinets were already installed. As for the bits veering, you can't see where you are starting, hit a knot or a nail and off you go. The guide tool is OK but not too accurate, it really keeps you from messing up the plaster or sheetrock.
 
infinity said:
If drilling from the basement up into a wall I will usually drive a very small nail down against the molding.

We sometimes will put an insulation "rod" in a drill and drill it through the floor tight to the baseboard. The rod is long enough so you can find it, and hole is so small it doesn't show. We find piles of them left on new construction jobs and keep a few dozen in each truck. By insulation "rod" I mean the stiff wire thingies that hold the insulation up in a basement ceiling.
 
bjp_ne_elec said:
On the flex bits, when do you typically use them? I've seen them hanging there at the supply house, but have been leary of picking one up - to your point about the sharp learning curve. The scenarios you mention about damage to a floor, are you drilling up from first floor to second floor - and if so, what deflects the tip of the drill to do the damage? I'm just not picturing the situation that you're talking to, I quess.
Imagine installing recessed cans in a ceiling with living space above. The cans that are in a line parallel with the joists are easy to fish from one to another. What about a wiring path perpendicular to the joists?

If you can't come out of one joist space at one end, turn 90 degrees, and enter another joist space to the next row, you'll have to drill a pathway through several joists, and pull the wire through them.

It's easy to start the bit in the first joist, the one you can see through the can hole, but if the bit angles up much at all, by the time you're through two or three joists, the tip could be against the upstairs floor.

One more joist, and you're in the room upstairs. If you're lucky, and it's carpeted, a hammer (and cardboard rug protection) might make the bump flat. Otherwise, it's a carpenter and a floor refinisher.

Another scenario: you're adding a ceiling light in a room which up to now only has a switched receptacle. How do you get from the switch into the ceiling? Sure, you can measure and hope you hit the same stud space.

If it's an attic above, you can drill up through the box opening and find the tip of the bit poking through the insulation. If the attic has a floor, you can drill through that, too, and use this hole to help fish the wire.

Then you can push a fishtape through this hole toward the eve, pull your wire in, fish it down to the box, then pull the loop back under the attic floor. If the hole is an issue, a nail-plate is a quick fix.

(Of course, I'm talking about an unfinished floor!)

What if you're asked to install a new overhead box for a fan or light? How can you avoid making any access holes requiring wall or ceiling repair? This is where the flex flashlight and handled mirror come into play.

I drill up, from an existing or new switchbox hole, in a stud space that is in line with the joist space, and feed a fishtape through the hole, with the tip curved just enough to steer it toward the new ceiling hole.

A steering handle is available for redirecting the tip of the bit back against the wall, toward the room you're in, in case there's blocking between the joists, typically centered over the central load-bearing wall.

This also applies when working in an exterior wall, as you need the hole to be at least 1.5" from the outside wall. You can drill up where the bottom half of red arrow (see above) is to access the joist space.

Again, with a flashlight and mirror, you can observe the tip of the bit, as well as the fishtape, through the ceiling hole, and guide your assistant's efforts. Oh, did I forget to mention that a good helper is a must?
 
Last edited:
We have used flex bits too. Honestly we try to avoid them. First time the bit went right in, or should I say out. The hole poked through the side of the house. Another time the bit drilled through the bottom plate only to strike a piece of NM cable in the ceiling below. A simple one hour job took half a day to fix. They do have a definite purpose but the is a large learning curve involved with using them.
 
Larry what a wonderful job! Absolute agreement, without the learning curve (or lotsa luck) it's quite probable that diversibits/ flexible bits will come out the wrong place.

For working alone, just a simple electrician's bit and a 5 foot diversibit is all I can handle. The 6 footers will allow a greater range of applications, but they're too much without a helper; they really flop around and without someone in the attic watching for a penetration through the top plate it's just too easy to go right through the roof (my specialty.) The 5 footer will allow a wall switch-to-something reach.

You posted a question about a plaster wall last week. Most of the 50's houses like this I've run into used a board with 'about' 2 inch holes all over, somewhat like a pegboard. The plaster which squeezes into the bays might or might not be an issue. It's possible that breaking into the wall is your only option.
 
I will take a wire coat hanger and cut it up into 8" then I will cut 1 end on a sharp angle then drill thru floor. I only do this with carpeting . then i go down to basement crawl spce find coat hanger. and mesure over 2 " then drill up. you can use coat hanger over and over. Trick is not to put mcuh pressure on drill other wise coat hanger will bend . this is also good if you are trying to locate a spot in ceiling with attic over it and lots of insulation.
 
I was just glancing through, the only thing I didn't see was a 3 5/8" hole saw to fit 3/0 cutin boxes, I use a flex bit quite a bit on interior walls (especially when I dont have help) it just makes for less trips into the crawl. Good sawzall blades including carbide, possibly all carbide hole saws. I like to have all the "old school" and "new school" fishing tools, including jack chain and magnets, glow sticks, fish tapes, and the little hole that only fits 14 guage wire on the end of the flex bit. Good to have a stud finder, or be able to "hear" where they are.
 
I also have learned to pay close attention to location of water and gas lines. I have drilled through both. When the water starts running down onto your arms, it creates an unpleasant feeling in the pit of my stomach. Same with smelling natural gas all of a sudden. Can be a costly job doing things like drilling into those pipes.;)
 
Larry Fine - In the very informative first post of yours on this thread, I'm trying to totally grasp what you say - and I'm having trouble with the last section.

Here is the portion I'm not fully understanding:
What if you're asked to install a new overhead box for a fan or light? How can you avoid making any access holes requiring wall or ceiling repair? This is where the flex flashlight and handled mirror come into play.

I drill up, from an existing or new switchbox hole, in a stud space that is in line with the joist space, and feed a fishtape through the hole, with the tip curved just enough to steer it toward the new ceiling hole.

A steering handle is available for redirecting the tip of the bit back against the wall, toward the room you're in, in case there's blocking between the joists, typically centered over the central load-bearing wall.

This also applies when working in an exterior wall, as you need the hole to be at least 1.5" from the outside wall. You can drill up where the bottom half of red arrow (see above) is to access the joist space.

Again, with a flashlight and mirror, you can observe the tip of the bit, as well as the fishtape, through the ceiling hole, and guide your assistant's efforts. Oh, did I forget to mention that a good helper is a must?

Having trouble how you're using the flex flashlight and mirror - and also you mention "drill up where the bottom half of the red arrow" - are you in the lower floors space and drilling up? And if so, your trying to come out in the ceiling space above the floor your on? Is this accurate?

Thanks,

Brett
 
Status
Not open for further replies.
Top