Old Work Recessed Lights

Status
Not open for further replies.
lod work recessed lights

lod work recessed lights

I also install recess lights like Bikelndy and Marcerrin, I have been installing recessed lights like this since 1973 and never hit anything. You can drill slow and feel before you drill by tapping the bit in the joist and know you are hitting only wood and by not drilling through the joist to far just stop when the bit goes through. If you are careful you can feel what you are drilling and stop before damage. If you have ever ran a backhoe you can feel even the smallest pebble with the bucket. I have ran the bucket across electric lines and water lines clearing dirt without ever damaging either. Nothing like experence and time in your trade for becoming good at what you do. Everyone has there on way and all jobs are different. I have also had to cut sheetrock between joist in some cases. Good to see everyones way of doing work, all are correct just different. Good Luck out there. Semper Fi. Buddy
 
I've never installed cans so far apart that I had to drill through more than three joists between holes. Often, I'll install four in a rectangle around an existing ceiling box. I start by removing that box and drilling at angles toward the corners, like a big X, until I penetrate the space where the cans will go.

If I'm using the flex-bits with the thinner shank, I can push and/or pull them through the joists with the NM in tow, and pull them out, head-end first, through the can holes. Sometimes, I have to hook the wire into the hole in the tip of the bit, and pull back towards the center hole. Sometimes, I'll thread a fishtape through drilled holes.

I do this by allowing several inches of the EGC between the bit and the tapered-taped NM, and pulling while spinning the bit, alternating between FWD and REV, but spinning the bit no more than about two turns each way to avoid breaking the EGC. Usually, about two spins each way is enough to back through each joist.

Sometimes, I'll need to pull down crown molding to run between joist bays if that option is available. I have even run wires to new ceiling boxes when there is a room above, with no patching required. If you understand how houses are built, you can figure out a way.

I once installed a track-lighting system in a one-floor-plus-loft condo for a friend. The living room had a sloped ceiling, and he wanted a track along the bottom of the slope, along the curtains, and one track along each side of the slope, facing the walls.

The only patching required (that would show) was on the back side of the wall at the top of the slope, which faced the loft. We installed the dimmers (one for each track) at the bottom of this wall, in the living room. I had to remove the baseboard in the loft to drill through the plates between floors.

I ran the three NM's in the wall up from the 3-gang box, through the plates and loft floor, in the loft wall, through the top plates drilled via the access hole, down the slope, and out of a slot that the bottom track would cover. I made matching slots, about 3/4" by 3", beneath each rafter, that the track would cover.

Two NM's went one way, hitting the bottom track and one slope track, and the third NM to the slope track the other way. Since the two slope tracks started about 2 feet up from the bottom one, I had to feed the NM's back up the slope those two feet. A bit of drywall compound covered the NM, and the track covered the compound.


Hey, if this were easy, everyone would be doing it! :cool:
 
Bulldog1401 said:
Amen. I cant believe that there are people out there drilling blind!! Nick a water pipe or gas line once. now repairs cost you more than you could have ever made in profit.

It isin't so blind if you have half a brain to look upstairs and have a little idea of how a home is built and where thigs are generally placed and it is easy to know if your bit is drilling farther than you want when you start the hole you bump it against the drywall this makes a nice line on the bit and you go 1 1/2" too much farther and you might need to stop. Remember the best tool you have is your brain.
 
never notch

never notch

most building inspectors would hate to see a notch it is a good posibility that you have just taken all the load strenght out of the lumber
Bob
 
bikeindy said:
It isin't so blind if you have half a brain to look upstairs and have a little idea of how a home is built and where thigs are generally placed and it is easy to know if your bit is drilling farther than you want when you start the hole you bump it against the drywall this makes a nice line on the bit and you go 1 1/2" too much farther and you might need to stop. Remember the best tool you have is your brain.

My brain tells me that no matter how much I spock out the layout of the house, what is on the other side of that floor joist I can't see just might be a ser cable feeding a subpanel someplace, or maybe some 14-2 for a remote floodlight fixture. Or some security system cable, or some telephone cable, or.... I rewire lots of houses. For the above reasons I will find another way to do it than blind drilling.
 
i don't think we should be criticizing (sp?) visually impaired electricians...not their fault they can't see:D
 
BobEnsor said:
most building inspectors would hate to see a notch it is a good posibility that you have just taken all the load strenght out of the lumber
If you're addressing me, the wire is below the joist, not notched into it.


emahler said:
i don't think we should be criticizing (sp?) visually impaired electricians...not their fault they can't see
Yeah, after a few arcing faults, our vision goes way down.
 
old work recessed lights

old work recessed lights

I don't think anyone means to be putting anyone down or I hope not, everyone has there own way of doing things. Larry sounds like you and I do work about the same and Bikeindy like that commit. Semper Fi. Buddy
 
There is no one way to do it, either way works, blind drill work is always risky, and the argument of customers not wanting to see patches is valid, some where in between might be a good way to go, it was noted using a sharp bit prevents drift, and taking care to investigate the area before drilling blind, over the years, I have seen many blind drill jobs go bad, experience, and a good check of the area, does not always prevent some jobs from going bad, if you do any damage, fix it and move on, one EC told me he tags on a little extra on every blind drill job to cover the possible one that goes bad, so he must feel it pays to drill blind.
 
I've managed to drill through a PVC sewer line and nicked a set of freon lines by blind drilling like that, but I still do it. Just the cost of doing business. Murphy's law of blind drilling like that always says that it's the cheap little homes that go off without a hitch, and the hiccups only occur in highly finished, expensive homes. :grin:
 
why would you

why would you

Want to take on any responsibility for drilling blind. It should not fall on your shoulders when a customer wants alteration work with no damage and no responsibility for trying to create less damage by drilling blind. Ceilings are about the easiest things to patch unless it is popcorn or sandpaint and that is remedied by drilling a 6" hole instead of a 4" hole. sooner or later you are going to get burned so why take the chance. Why dont we go out and dig without a markout other than it being against the law.
 
clean holes and no chance for callbacks

clean holes and no chance for callbacks

aline said:
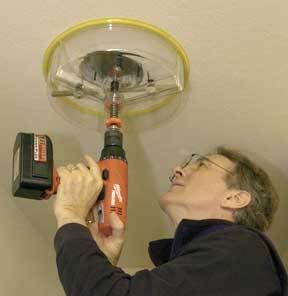
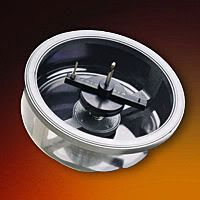
Use an adjustable hole cutter. It contains the dust.
Use it to cut the holes for the cans and for access holes for the joists then use a right angle drill with a short bit to drill through the joist.
Save the sheetrock plug and screw it back to the joist.
Add some 1/4 in. x 2 in. wood strips if necessary to keep the sheetrock plug level.
Take some drywall compound the kind that comes in a tube, goes on pink and turns white when it dries and fill the in the seam and screw holes.

I used this tool to cut access holes in a finished basement to run 4/0 SER cable 50 ft. for a new panel installation.
Worked out great. The ceiling was textured and after putting the plugs back and squeezing in the sheetrock compound you could hardly see where the plugs were. A little paint and it would disapear completely.

AdjustableHoleCutter4.jpg

AdjustableHoleCutter3.jpg


The picture shown with the hole cutter in use is for a Hole Pro adjustable hole cutter (www.holepro.com). I have been using a couple for over two years. They use twin blades so there is no broken balance bar to fool with and the holes are smooth and fast to cut. The shield is lightweight and I can stand on it and have dropped mine onto a concrete floor and it was fine.

I don't have to trace a hole on the ceiling or have the sheetrock going into my nose, throat, armpits, etc. and there is virtually no time spent cleaning up. I like that I can cut a hole with one hand on the drill and the other on the ladder.

It is the best way I have found for cutting holes in lathe and plaster ceilings. With any tool that vibrates, and in particular a sabre saw, the plaster can easily crack and the cost to repair a plaster ceiling and have it painted in California kills any profit from the electrical work. With the hole cutter the twin blades cut the hole like a knife.

I use the 8" model for recessed lighting and a 12" model when I am installing ceiling speakers for my clients home theater setups. Most 8" speakers take a 9-1/2" to 10-1/2" cutout and this tool works perfectly.

Tom

Edit to fix quote. - George
 
Status
Not open for further replies.
Top