Pics of panel rough-in

Status
Not open for further replies.

bjp_ne_elec

Senior Member
Location
Southern NH
Would love to see some of your panel rough-ins, if anyone is willing to post them, or PM them if you don't want to post. I just got back in to the trade (getting business going for my son) and I'm pretty nervous about my first new home rough-in - as the GC I'm working with has indicated he's interested in me doing more work for him. He was pretty specific - in that he's happy with the pricing I've given him, but the look and quality of the install is what he's still going to factor in. So, as you can see, the pressure is on.

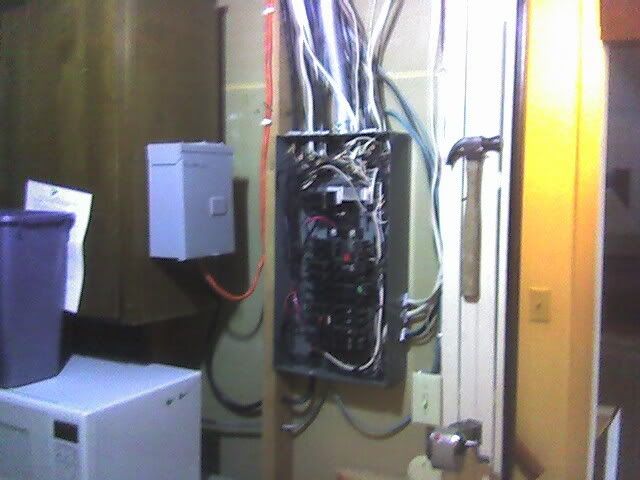
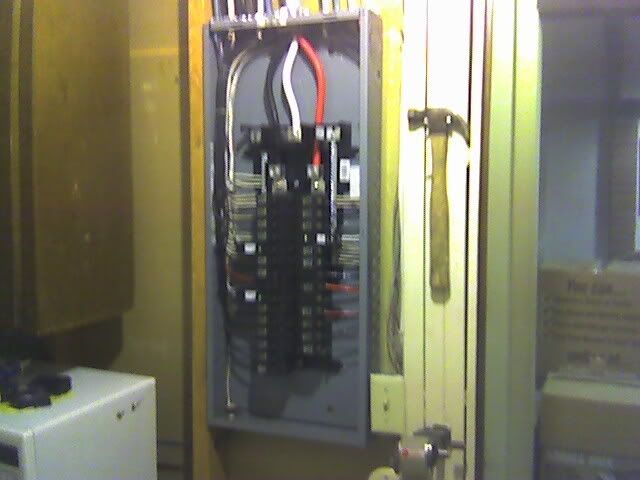
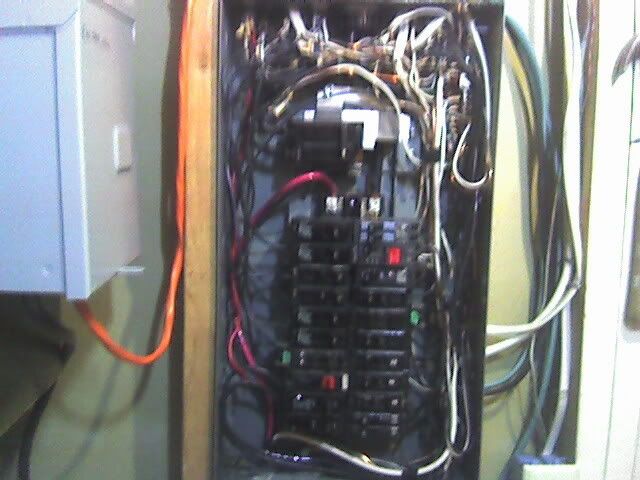
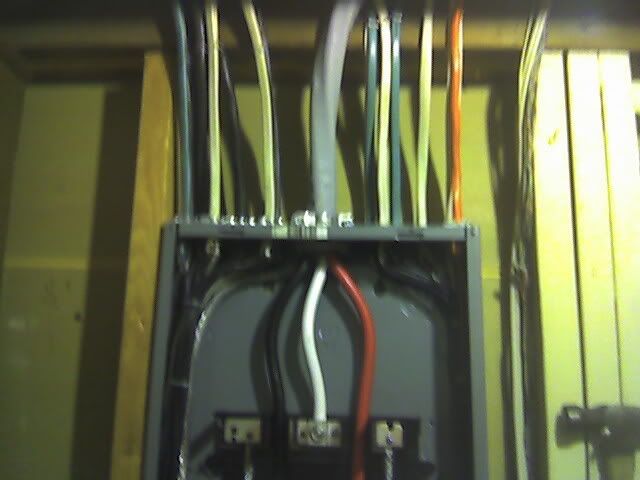
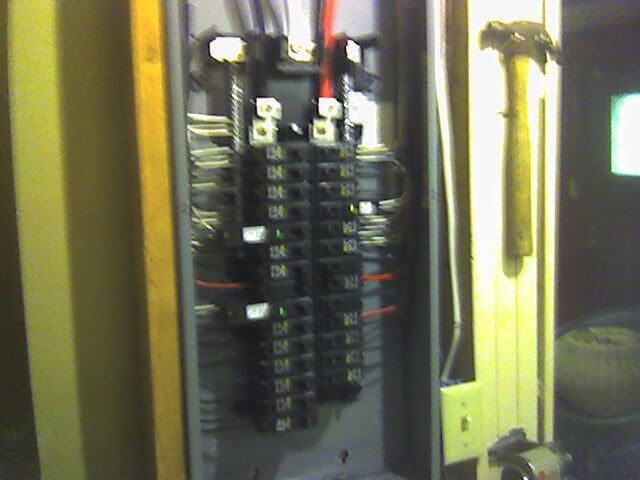
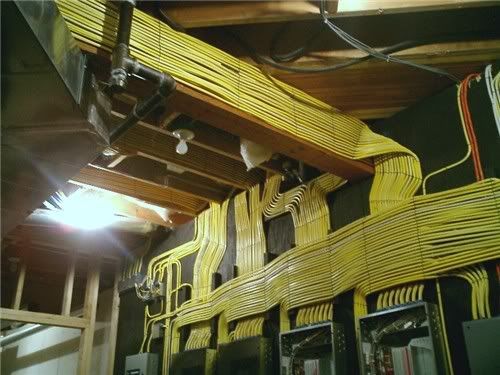
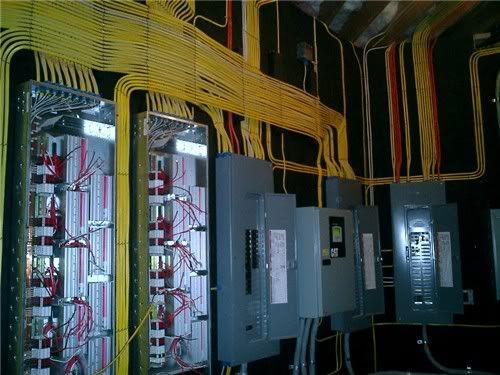
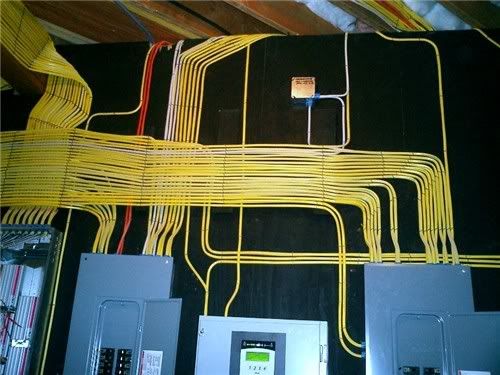
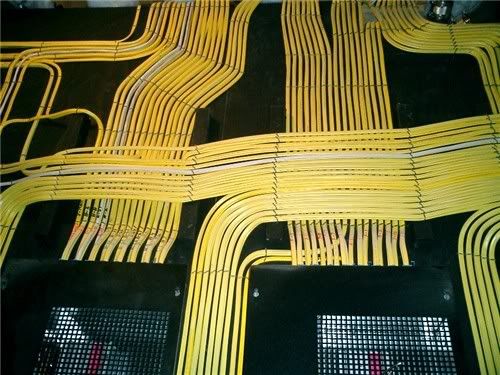
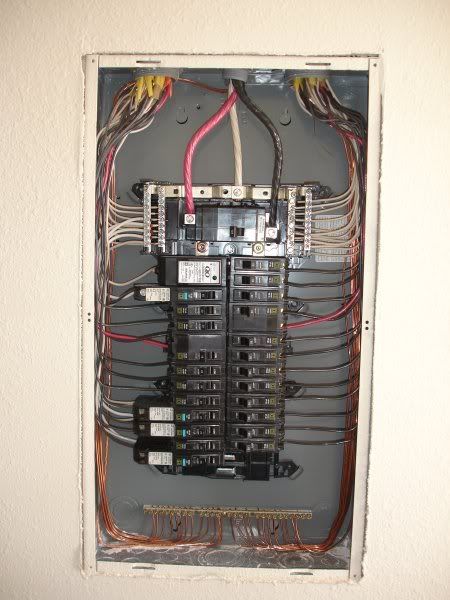
This particular job will have the panel fully exposed in the basement, so it would be great if I saw some of that great work that the members are installing. Curious how is all rolls in to the panel, how in particular you route and secure the Romex as it transitions in to the panel.

Thanks in advance,

Brett
 

George Stolz

Moderator
Staff member
Location
Windsor, CO NEC: 2017
Occupation
Service Manager
I'll show you mine if you show me yours. :D

(If you go to the link, you will find mine, Iwire's commercial panels - I thought it had a link to a thread on ECN of the most elaborate exposed work NM you will never see, but it doesn't. I'm still looking for it.)

He was pretty specific - in that he's happy with the pricing I've given him, but the look and quality of the install is what he's still going to factor in. So, as you can see, the pressure is on.
What pressure? :)

If you know this going in, tack a couple extra hours labor on to allow you to slow down for it. My pictures were of a recessed installation in the garage of a tract-home, where speed is what matters most. In an exposed custom home, more time should be factored in for more careful work.

I must confess, I installed a panel in a custom home in the hills once I ended up ashamed of. I screwed up by not drilling for the panel prior to pulling the home runs (per my routine). I drilled after all the home runs were in the area, and then tried to pull several in at once through each hole.

What ended up happening was I wound up with a nasty-looking rat's nest at the ceiling, where the NM turned and went down the wall. It was all exposed work, and in the frenzy to just get it done I ended up with a very ugly installation. To top it all off, it wasn't my house to begin with, so my normal routine for big houses of numbering the homeruns and creating a panel schedule as we went was overruled.

As a result, some of the runs had numbers, and some had descriptions written on them. As a result, the numbered sheet ended up less valuable, and got lost. And, the panel inside looked like garbage, because I have a hard time working with 4" - 8" long chunks of sheathing labels on the conductors. Even some of those got lost.

I learned my lesson, and try not to deviate from my routines. I'm feeble-minded enough that if I don't have a routine for something, and follow it, things go downhill in a hurry.

The homeowner never complained, but every few months I think about that panel and hang my head. :mad:
 
Last edited:

bjp_ne_elec

Senior Member
Location
Southern NH
George - thanks for the link.

I'm curious - in the one with the NM - yellow (12/2 - 12/3) on right and white (14/2 - 14/3)) on left - I'm curious if there are multiple Romex running in to the same connector.

Also - is that tie wraps securing the NM? I would have never thought of using tie wraps - but is it a "listed method"?

Speaking of multiple things in a hole (I hope this doesn't draw some non-electrical comments) - is it legitmate to put two Romex in the same drilled hole without derating. I remember seeing a related post, and I can't seem to find the correct section in the NEC that would straighten me out on this one.

I'll definitely give this one more time - not that I'd ever rush - but first impression means a lot in this business.

Thanks,

Brett
 
Last edited:

Dennis Alwon

Moderator
Staff member
Location
Chapel Hill, NC
Occupation
Retired Electrical Contractor
I wonder who wired this panel​

199%20Electrical%20Panel.jpg$ASSET
 

LarryFine

Master Electrician Electric Contractor Richmond VA
Location
Henrico County, VA
Occupation
Electrical Contractor
Here's a couple of one of mine, before and after breakers:

KwPanels1.jpg
KwPanels2.jpg


There are two stacked NM's in each KO except for #10's and larger.
 

bjp_ne_elec

Senior Member
Location
Southern NH
Larry - nice. Any way of getting the JPEG's - as it's hard to get details, as they're a little dark. What connectors are listed for dual entry? I'm also interested in how you secured the NM just above the panel/

Presonally I like those plastic ones that you push the little tab (it's hanging a a little plastic tag) - but I'm not sure if these are listed for two NM's.

Larry which manufacturer/part number did you use?

Thanks

Brett
 

bjp_ne_elec

Senior Member
Location
Southern NH
Dennis - that worked - but once I go zoom in, they're grainy. Have to rely on Larry's response.

Larry - one more question - and I noticed it when I zoomed in. What are thos two sets of Black/Whites that head in to the center area of the panel up near the top - between the two main lugs?

Thanks
 

aline

Senior Member
Location
Utah
These are before and after pictures from a panel replacement.

Before
PanelBefore2.jpg


After
PanelAfter1.jpg


Before
PanelBefore1.jpg


After
PanelAfter4.jpg


After
PanelAfter2.jpg
 
Last edited:

aline

Senior Member
Location
Utah
I don't know who's work this is but it's the neatest romex job I've ever seen.
Anyone want to lay claim to this work?

NeatRomexJob1.jpg


NeatRomexJob2.jpg


NeatRomexJob3.jpg


NeatRomexJob4.jpg
 

George Stolz

Moderator
Staff member
Location
Windsor, CO NEC: 2017
Occupation
Service Manager
Aline, that was the amazing job I tried to find earlier. Harold Endean saw the work, and passed it on for review over at the ECN forum. It is probably the most obscenely beautiful work I've seen.

The ECN forum was down, or I would have had a link together already. :)

Edit: here's the link, looks as though they've had a facelift as well. :cool:
 
Last edited:

tallgirl

Senior Member
Location
Great White North
Occupation
Controls Systems firmware engineer
The right side of this pic is my first attempt at finishing a panel. The left side was done by a journeypeep I work with regularly.

JuliePanel.jpg
 

tallgirl

Senior Member
Location
Great White North
Occupation
Controls Systems firmware engineer
Dennis Alwon said:
I think the original will be grainy when you zoom in also,

JPEGs are displayed pixel-for-pixel, so when you zoom in all you do is show the same pixel more than once.

What's need is the original, raw image. The panel pic I posted above was originally about 2000 pixels wide by 3000 high (7.2Mpx total). What was posted was 450 pixels wide by 600 high.
 

Dominator

Member
aline said:
I don't know who's work this is but it's the neatest romex job I've ever seen.
Anyone want to lay claim to this work?


damn...lovely. I don't do romex but seeing this makes me want to
 

LarryFine

Master Electrician Electric Contractor Richmond VA
Location
Henrico County, VA
Occupation
Electrical Contractor
bjp_ne_elec said:
Larry - nice. Any way of getting the JPEG's - as it's hard to get details, as they're a little dark. What connectors are listed for dual entry? I'm also interested in how you secured the NM just above the panel

Larry which manufacturer/part number did you use?

Larry - one more question - and I noticed it when I zoomed in. What are thos two sets of Black/Whites that head in to the center area of the panel up near the top - between the two main lugs?

They're the regular Halex plastic pop-ins, from the orange store. The black/white wires are the incoming (from main disco) and outgoing (to sub-panels) neutrals.

I'm too tired to create thumbs to click, so I'll just link to the raw pix on my server, since they're too big to post. Let me know how they are.

http://fineelectricco.com/panelsbig.jpg
http://fineelectricco.com/panelA.jpg
http://fineelectricco.com/panelB.jpg
http://fineelectricco.com/panelBclose.jpg
http://fineelectricco.com/panellugs.jpg
http://fineelectricco.com/panelstaples1.jpg
http://fineelectricco.com/panelstaples2.jpg

Here are a couple of others from the same job. (I didn't do the subs, one of my guys did. The 3 boxes are for remote lighting, and the last is how I ran the coax and CAT-5 home-runs.)

http://fineelectricco.com/subs.jpg
http://fineelectricco.com/boxes3far.jpg
http://fineelectricco.com/boxes3near.jpg
http://fineelectricco.com/boxes3rear.jpg
http://fineelectricco.com/boxes2rear.jpg
http://fineelectricco.com/boxes2clip.jpg
http://fineelectricco.com/LVclose.jpg
 

blue spark

Senior Member
Location
MN
On that Romex "Art" which by the way is amazing, what type of staples are those? I can't tell from the pictures. They don't look like standard straps.
 

benmin

Senior Member
Location
Maine
Occupation
Master Electrician
blue spark said:
On that Romex "Art" which by the way is amazing, what type of staples are those? I can't tell from the pictures. They don't look like standard straps.

They look like the standard uninsulated type. Looks better without the colored plastic insulator
 
Status
Not open for further replies.
Top